gatsby js, dva 教程
 Edit on GitHub
gatsby develop
— Gatsby will start a hot-reloading development environment accessible at localhost:8000
gatsby build
— Gatsby will perform an optimized production build for your site generating static HTML and per-route JavaScript code bundles.
gatsby serve
— Gatsby starts a local HTML server for testing your built site.
Try using Surge for deploying your first Gatsby website
Surge is one of many “static site hosts” which make it possible to deploy Gatsby sites.
installed & set up Surge
npm install --global surge# Then create a (free) account with themsurge
Next, build your site
make sure you’re running this command at the root of your site
gatsby build
deploy your site by publishing the generated files to surge.sh
//look at the public directory:ls publicsurge public/
gatsby 生成页面时,页面组件的 props 分析
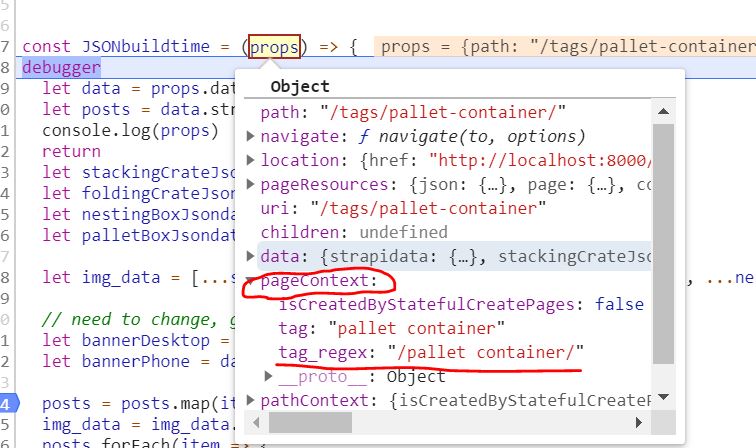
利用 Gatsby 的 createPage 方法,可以在 gatsby-node.js 中生成页面,并且可以传页面的 一些 pageContext 变量例如:我们在生成 tag 页面时 传了 tag 和 tag_regex 变量createPage({path: tagPath,component: require.resolve(`./src/templates/tags.js`),context: {tag,tag_regex,},})我们这时可以在组件的 props 的 pageContext 取到 tag 和 tag_regex 的值
可以看到 graphgq 查询到的 数据在 props 的 data 属性里
部署Gatsby 到自己的服务器 nginx 配置
// 将根文件指向 public 目录下root /data/wwwroot/www.movingbox.cn/public;// 指定404 文件(nginx)location /{try_files $uri $uri/index.html =404;error_page 404 /404.html;}// 指定404 文件(apache)<Directory "/data/wwwroot/www.storagebinsell.com">SetOutputFilter DEFLATEOptions FollowSymLinks ExecCGIRequire all grantedAllowOverride AllOrder allow,denyAllow from allDirectoryIndex index.html index.php...ErrorDocument 404 /404.html</Directory>
Using the Static Folder 静态文件
You can create a folder named static at the root of your project. Every file you put into that folder will be copied into the public folder. E.g. if you add a file named sun.jpg to the static folder, it’ll be copied to public/sun.jpg
比如在根目录的 static 目录下有 这个文件/static/img/home/main-slider-attached-lid-container.jpg我可以这样访问到${domain}/img/home/main-slider-attached-lid-container.jpg
Gatsby Link API
Link provides two options for adding styles to the active link
- activeStyle — a style object that will only be applied when the current item is active
- activeClassName — a class name that will only be added to the Link when the current item is active
import React from "react"import { Link } from "gatsby"const SiteNavigation = () => (<nav><Linkto="/"{/* This assumes the `active` class is defined in your CSS */}activeClassName="active">Home</Link><Linkto="/about/"activeStyle={{ color: "red" }}>About</Link></nav>)
Use getProps for advanced link styling
- isCurrent — true if the location.pathname is exactly the same as the Link component’s to prop
- isPartiallyCurrent — true if the location.pathname starts with the Link component’s to prop
- href — the value of the to prop
- location — the page’s location object
封装 gatsby Link,导出ExactNavLink、PartialNavLink
import React from "react";import { Link } from "gatsby";const isActiveWrap = (props) => {const isActive = ({ isCurrent }) => {let activeClassName = 'active'if(props.className){activeClassName+=` ${props.className}`}return isCurrent ? { className: activeClassName } : {}}return isActive}export const ExactNavLink = props => {return <Link getProps={isActiveWrap(props)} {...props} />}// this link will be active when itself or deeper routes// are currentconst isPartiallyActiveWrap = (props) => {const isPartiallyActive = ({isPartiallyCurrent}) => {let activeClassName = 'active'if(props.className){activeClassName+=` ${props.className}`}return isPartiallyCurrent? { className: activeClassName }: {}}return isPartiallyActive}export const PartialNavLink = props => (<Link getProps={isPartiallyActiveWrap(props)} {...props} />)
使用案例
import { ExactNavLink, PartialNavLink } from "../yjLink";...<ExactNavLink className={`nav-link header-item`} to={item.url} title={item.text}>{item.text}</ExactNavLink>
改变port
gatsby develop -p 4000
netlify gatsby 配置
想加一个分类,如moving crates,需要
在static/admin/config.ymlcollections:name: "movingCrate" //分类名label: "Moving Crate"folder: "src/pages/moving-crate" //单个产品存放的路径及文件夹create: trueslug: "{{slug}}"fields:- {label: "Template Key", name: "templateKey", widget: "hidden", default: "movingcrate-post"}//模板文件- {label: "Title", name: "title", widget: "string"} 某个字段定义好了模板如 movingcrate-post需要在 src/templates 下面新建模板movingcrate-post.js在src/pages下面新建moving-crates文件夹 来存放分类页html 和单个的post .md 页面并修改moving-crates文件夹里面的index.js在src/cms/preview-templates/ 里面新建MovingcratePostPreview.js并修改其内容
move to new inquiry system
1. gatsby-config.js把 gatsby-source-strapi 的 apiURL 由https 变为 http2. package.json 中 把 gatsby-source-strapi 依赖升级为 ^0.0.123. src/utils.js 中改变export const inquiry_handle_inquiry_url = '/inquiry/new';新增export const company_name = 'joinplastic';export const remote_ip_url = 'https://api.db-ip.com/v2/free/self';4. src/components/InquiryForm.js 中 和 src/pages/contact/index.js 中增加company_name,remote_ip_urlplace 1(引入新变量):import {cdn_img_thumbnail,contact_email,inquiry_handle_base_url,inquiry_handle_app_name,inquiry_handle_inquiry_url,inquiry_handle_email_url,inquiry_api_success_code,company_name,remote_ip_url} from '../utils'place 2 (state 中赋初始值):this.state = {isValidated: false,product_model: '',product_quantity: '',p_img: cdn_img_thumbnail,from_url: '',sending: false,showThanks: false,to_email: contact_email,company_name,remote_ip: ''};place 3 (componentDidMount 中获取client ip 并赋值)componentDidMount() {//...axios.get(remote_ip_url).then(res => {if(res && res.data && res.data.ipAddress){this.setState({remote_ip: res.data.ipAddress})}})}