nodejs 的安装和使用
centos 安装node.js
Step 1 – Add Node.js Yum Repositoryyum install -y gcc-c++ make//For Latest Release:curl -sL https://rpm.nodesource.com/setup_12.x | sudo -E bash -//setup_12 这个12是版面//稳定版curl -sL https://rpm.nodesource.com/setup_8.x | sudo -E bash -Step 2 – Install Node.js and NPMyum install nodejsStep 3 – Check Node.js and NPM Versionnode -vnpm -v卸载 nodejs (最好用nvm管理node)yum remove -y nodejs
centos 安装nvm 管理node 版本
//如果没有curl,安装curlyum install curl -y//下载并安装 nvmcurl https://raw.githubusercontent.com/creationix/nvm/master/install.sh | bash//重新打开terminal后nvm 命令就生效了如果是Mac Catalina uses zsh by defaultexport NVM_DIR="$([ -z "${XDG_CONFIG_HOME-}" ] && printf %s "${HOME}/.nvm" || printf %s "${XDG_CONFIG_HOME}/nvm")"[ -s "$NVM_DIR/nvm.sh" ] && . "$NVM_DIR/nvm.sh" # This loads nvmcentos 每次打开新的 terminal,nvm 设置的 node 版本就失效,非要重新设置一下可以使用命令:nvm alias default node_versioneg:nvm alias default 14.19.0
ubuntu 安装nvm
curl -o- https://raw.githubusercontent.com/nvm-sh/nvm/v0.35.3/install.sh | bashVerify the NVM version installed with:nvm --versioninstall node, for example v18:nvm install v18
why node.js
CPU 密集 vs I/O 密集
cpu 密集:压缩、解压、加密、解密I/O 密集:文件操作、网络操作、数据库
进程
是计算机中的程序关于某数据集合上的一次运行活动,是系统进行资源分配和调度的基本单位
多进程
启动多个进程,多个进程可以一起执行多个任务
线程
进程内一个相对独立的、可调度的执行单元,与同属一个进程的线程共享进程的资源
多线程
启动一个进程,在一个进程内启动多个线程,这样,多个线程也可以一块执行多个任务
Node.js 的单线程(single-threaded)
单线程只是针对主进程,I/O 操作系统底层多线程调度单线程并不是单进程
create a child process
There are four different ways to create a child process in Node:spawn(), fork(), exec(), and execFile().
Spawned Child Processes
const { spawn } = require("child_process");const child = spawn("pwd");child.on("exit", function(code, signal) {console.log("child process exited with " + `code ${code} and signal ${signal}`);});
child_process.exec()
// child_process.exec(command[, options][, callback])// 利用child_process 备份mongodbconst { exec } = require('child_process');exec(`mongodump --uri mongodb+srv://${process.env.mongodb_user}:${process.env.mongodb_pwd}@lxc-atlas-cluster.ekop2.mongodb.net/customer --out ${folderName}`, (error, _stdout, _stderr) => {if (error) {console.error(`exec error: ${error}`);return;}console.log(`stdout: ${stdout}`);console.error(`stderr: ${stderr}`);});
we can register handlers for events on this child object directly. For example, we can do something when the child process exits by registering a handler for the exit event:The other events that we can register handlers for with the ChildProcess instances aredisconnect,error,close,messageThe message event is the most important one. It’s emitted when the child process uses the process.send() function to send messages. This is how parent/child processes can communicate with each other. We’ll see an example of this below
常用场景
Web Server本地代码构建实用工具的开发,比如爬虫
Nodejs 运行机制
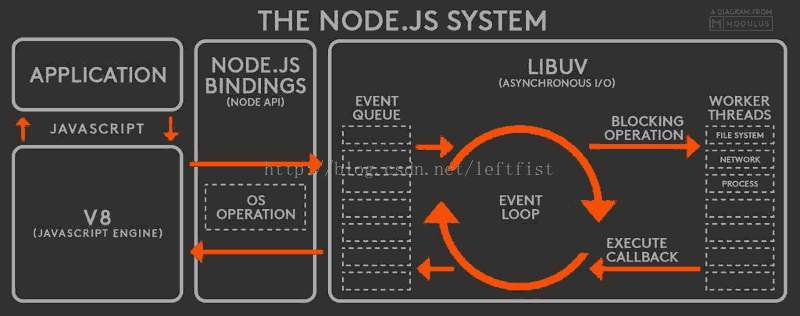
Node.js是一个事件驱动I/O服务端JavaScript环境,基于Google的V8引擎,V8引擎执行Javascript的速度非常快,性能非常好。将libuv作为跨平台抽象层,libuv是用c/c++写成的高性能事件驱动的程序库。
nodejs运行流程
1,V8引擎解析JavaScript脚本。2,解析后的代码,调用Node API。3,libuv库负责Node API的执行。它将不同的任务分配给不同的线程,形成一个Event Loop(事件循环),以异步的方式将任务的执行结果返回给V8引擎。4,V8引擎再将结果返回给用户。
事件循环(Event Loop)
nodejs 执行之后会初始化一个事件循环,执行代码程序(这些程序可能会造成异步调用、定时器或者process.nextTick()),然后开始执行事件循环。

nodejs event loop的6个阶段
timers:执行setTimeout() 和 setInterval()中到期的callback。I/O callbacks:上一轮循环中有少数的I/O callback会被延迟到这一轮的这一阶段执行idle, prepare:仅内部使用poll:最为重要的阶段,执行I/O callback,在适当的条件下会阻塞在这个阶段check:执行setImmediate的callbackclose callbacks:执行close事件的callback,例如socket.on("close",func)
浏览器中的 Event Loop
Javascript 有一个 main thread 主线程和 call-stack 调用栈(执行栈),所有的任务都会被放到调用栈等待主线程执行。
js 是单线程的是的是js 引擎线程。
在浏览器中,有js 引擎线程 和渲染线程,且两个线程互斥。
node js 环境中,只有js 线程
异步任务的分类
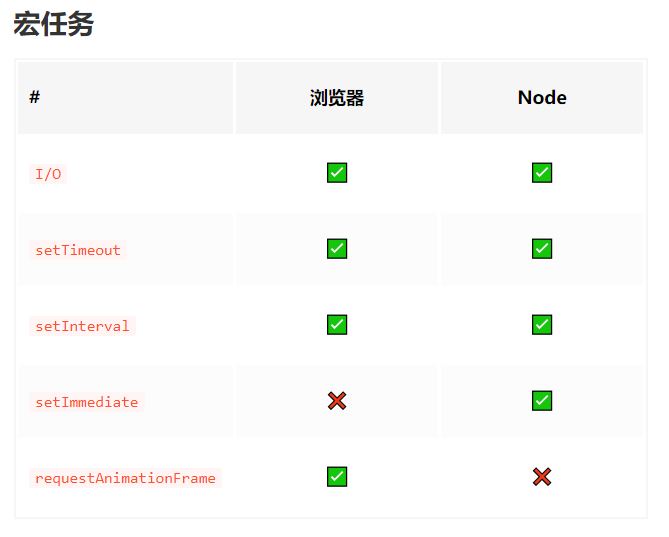
宏任务
macrotask
task主要包含:setTimeout、setInterval、setImmediate、I/O、UI交互事件

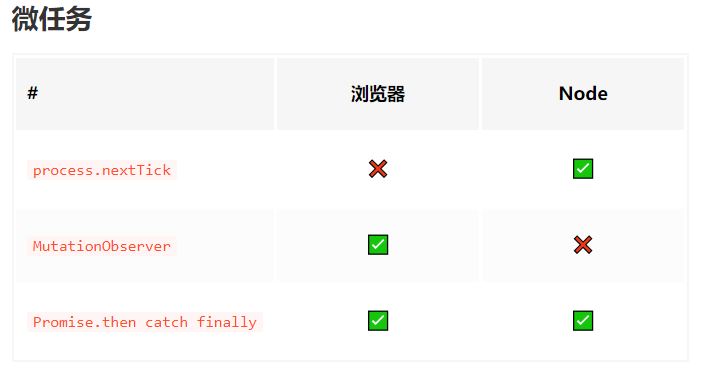
微任务
microtask
microtask主要包含:Promise、process.nextTick、MutaionObserver

事件循环机制
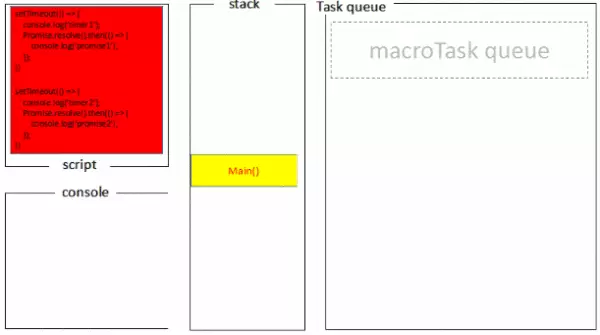
JS引擎线程会维护一个执行栈(Execution stack),同步代码会依次加入到执行栈中依次执行并出栈。JS引擎线程遇到异步函数,会将异步函数交给相应的Webapi,而继续执行后面的任务。Webapi会在条件满足的时候,将异步对应的回调加入到消息队列(message queue )中,等待执行。执行栈为空时,JS引擎线程会去取消息队列中的回调函数(如果有的话),并加入到执行栈中执行。完成后出栈,执行栈再次为空,重复上面的操作,这就是事件循环(event loop)机制。
microtask 必然是在某个宏任务执行的时候创建的,而在下一个宏任务开始之前,浏览器会对页面重新渲染(task >> 渲染 >> 下一个task(从任务队列中取一个))。
同时,在上一个宏任务执行完成后,渲染页面之前,会执行当前微任务队列中的所有微任务。

JS调用栈
JS调用栈采用的是后进先出的规则,当函数执行的时候,会被添加到栈的顶部,当执行栈执行完成后,就会从栈顶移出,直到栈内被清空。
前端使用异步的场景
定时任务: setTimeout(), setInterval()网络请求: ajax 请求, 动态<img>加载事件绑定
Node.js 全局对象
在浏览器 JavaScript 中,通常 window 是全局对象, 而 Node.js 中的全局对象是 global,所有全局变量(除了 global 本身以外)都是 global 对象的属性
设置全局对象的方法
global.testVar = 1000
常见的全局对象
bufferprocess//The process object is a global that provides information about, and control over, the current Node.js process.console
commonJS
每个文件都是一个模块,有自己的作用域在模块内部 module 变量代表模块本身module.exports 属性代表模块对外接口
exports 与 module.exports
node 模块的代码会被包裹到(function(exports, require, module, __filename, __dirname){// our code});代码在执行之前,会执行const exports = module.exports;exports 是 module.exports 的快捷方式如果写exports.test = 100 是可以的,相当于写 module.exports.test = 100如果写exports = {a: 1,b: 2,test: 100}那就改变了exports 的指向,由以前的 module.exports 变为 一个新的对象,而 module.exports 与这个新的对象没有任何关系,所以这个文件被主文件引用时module.exports 的属性里没有 新对象里面的属性,如a,b,test如果写module.exports = {a: 1,b: 2,test: 100}是可以的,因为暴露到外面的就是 module.exports 这个接口总结:可以使用exports 快捷方式添加属性,如 exports.a='a_value',但是不能改变exports 的指向,如 exports = {a: 'a_value'}
require 规则
/ 表示绝对路径, ./表示相对于当前文件的路径支持 js, json, node 扩展名,不写扩展名的话,会依此尝试如果不写路径,则认为是 build-in 模块或者各级 node_modules 内的第三方模块module 被加载的时候执行,加载后缓存(如果加载多次某个文件,则只会执行一次)一旦出现某个模块被循环加载,就只输出已经执行的部分,还未执行的部分不会输出
Conditional exports
Conditional exports provide a way to map to different paths depending on certain conditions. They are supported for both CommonJS and ES module imports.
// package.json{"exports": {"import": "./index-module.js","require": "./index-require.cjs"},"type": "module"}
timer
setImmediate(()=>{console.log('setImmediate')})// 下一个队列的队首setTimeout(()=>{console.log('timeout')})// nextTick 之后 setImmediate 之前process.nextTick(()=>{console.log('next tick')})// nextTick 会被放在当前队列的队尾let racer = function() {setImmediate(() => console.log("immediate"));setTimeout(() => console.log("timeout"), 0);process.nextTick(() => console.log("nextTick"));console.log("current event loop");}racer()// outputcurrent event loopnextTicktimeoutimmediate要点:setImmediate 其实是最慢的,nextTick 最快。
__filename
等于 module.filename
__filename 表示当前正在执行的脚本的文件名。它将输出文件所在位置的绝对路径,且和命令行参数所指定的文件名不一定相同。 如果在模块中,返回的值是模块文件的路径。
console.log( __filename );/web/com/runoob/nodejs/main.js
__dirname
__dirname 表示当前执行脚本所在的目录。
console.log( __dirname );/web/com/runoob/nodejs(目录)
process
The process object is a global that provides information about, and control over, the current Node.js process. As a global, it is always available to Node.js applications without using require().
process.cwd();
是当前执行node命令时候的文件夹地址 / 项目的根路径
"d:\projects\Orion"
Node.js Built-in Modules
Node.js Path Module
var path = require('path');var x = path.join('Users', 'Refsnes', 'demo_path.js');console.log(x);//Users\Refsnes\demo_path.jsconst { basename, dirname, extname } = require('path');const filePath ='/usr/local/a/b.tex'console.log(basename(filePath))// b.texconsole.log(dirname(filePath))// /usr/local/aconsole.log(extname(filePath))// .texconst { parse, format } = require('path');const filePath ='/usr/local/node_modules/n/package.json'const ret = parse(filePath)console.log(ret){base:"package.json",dir:"/usr/local/node_modules/n",ext:".json",name:"package",root:"/"}console.log(format(ret))// /usr/local/node_modules/n\package.json
./
在 require 方法中总是相对于当前文件所在的文件夹在其他地方 和 process.cwd() 一样,相对于 node 启动文件夹
Buffer
Buffer 用于处理二进制数据流实例类似整数数组,大小固定c++ 代码在 V8 堆外分配物理内存
process.env
The process.env property returns an object containing the user environment.
An example of this object looks like:{TERM: 'xterm-256color',SHELL: '/usr/local/bin/bash',USER: 'maciej',PATH: '~/.bin/:/usr/bin:/bin:/usr/sbin:/sbin:/usr/local/bin',PWD: '/Users/maciej',EDITOR: 'vim',SHLVL: '1',HOME: '/Users/maciej',LOGNAME: 'maciej',_: '/usr/local/bin/node'}
引用dotenv模块可以得到.env里面的配置 并将其添加到process.env loads environment variables from a .env file into process.env
//first npm install dotenv --save//As early as possible in your application, require and configure dotenv.require('dotenv').config();如果.env 内容是:SESSION_TIMEOUT=30IDLE_TIMEOUT=20那么:process.env 就多了:{...SESSION_TIMEOUT:30IDLE_TIMEOUT:20}
install nvm (Node Version Manager (nvm) for Windows)
1:uninstall node.jsAlso delete any existing nodejs installation directoriese.g., "C:\Program Files\nodejs"You should also delete the existing npm install locatione.g. "C:\Users<user>\AppData\Roaming\npm"e.g. "C:\Users<user>\AppData\Roaming\npm-cache"2: downloadhttps://github.com/coreybutler/nvm-windows/releasesnvm-noinstall.zip3: installfor detail :https://blog.csdn.net/tyro_java/article/details/51232458
using mirror in China
open C:\Users\Anthony LU\AppData\Roaming\nvmsettings.txt 加上:arch: 64proxy: nonenode_mirror: https://npm.taobao.org/mirrors/node/npm_mirror: https://npm.taobao.org/mirrors/npm/
设置代理
nvm proxy [url]: 设置用于下载的代理nvm proxy http://127.0.0.1:7890nvm proxy none//设置[url]为none删除代理
use nvm
nvm on// 使nvm 生效(刚安装好nvm 后使用)nvm off//关闭nvmnvm install latestnvm install ## 安装指定版本,可模糊安装,如:安装v6.2.0,既可nvm install v6.2.0,又可nvm install 6.2nvm uninstall ## 删除已安装的指定版本,语法与install类似nvm use ## 切换使用指定的版本nodenvm ls ## 列出所有安装的版本nvm ls-remote ## 列出所以远程服务器的版本(官方node version list)nvm current ## 显示当前的版本nvm alias ## 给不同的版本号添加别名nvm unalias ## 删除已定义的别名nvm reinstall-packages ## 在当前版本node环境下,重新全局安装指定版本号的npm包
nodejs read file
同步(blocking) fs.readFileSync
const fs = require('fs');let rawdata = fs.readFileSync('student.json');let student = JSON.parse(rawdata);console.log(student);
异步 fs.readFile
const fs = require('fs');fs.readFile('student.json', (err, data) => {if (err) throw err;let student = JSON.parse(data);console.log(student);});
node.js read and write json file
read
const fs = require('fs');//bufferlet rawdata = fs.readFileSync('./documents/test.json');console.log(rawdata)//objectlet student = JSON.parse(rawdata);console.log(student);
read Using require
let jsonData = require('./student.json');console.log(jsonData);
Writing JSON to a File
Using fs.writeFileSync
The writeFileSync function accepts 2-3 parameters: The path of the file to write data to, the data to write, and an optional parameter.
const fs = require('fs');let student = {name: 'Mike',age: 23,gender: 'Male',department: 'English',car: 'Honda'};let data = JSON.stringify(student);fs.writeFileSync('./documents/test_a.json', data);
let data = JSON.stringify(student);会让json file 都在一行,比较难读let data = JSON.stringify(student, null, 2);这样会缩进和serialize json,就比较好读了
Using fs.writeFile (in asynchronous manner)
const fs = require('fs');let student = {name: 'Mike',age: 23,gender: 'Male',department: 'English',car: 'Honda'};let data = JSON.stringify(student, null, 2);fs.writeFile('student-3.json', data, (err) => {if (err) throw err;console.log('Data written to file');});
什么是错误优先的回调函数?
错误优先的回调函数用于传递错误和数据。第一个参数始终应该是一个错误对象, 用于检查程序是否发生了错误。其余的参数用于传递数据。例如:fs.readFile(filePath, function(err, data) {if (err) {//handle the error}// use the data object});
如何避免回调地狱
模块化:将回调函数分割为独立的函数使用Promises