linux 常用快捷键
查看系统版本
lsb_release -a//readhatcat /etc/redhat-release
显示CPU架构信息和详细的CPU信息
lscpu
查看linux 是不是64位
arch//如果输出x86_64,则是64位
Linux 关机与重启命令
立刻关机(需要root用户)
shutdown -h now
10 分钟后自动关机
shutdown -h 10
立刻关机
halt或者poweroff
Linux重启命令
reboot或者shutdown -r now
安装软件centos yum
If you want to install packages automatically without asking for any confirmation, use the option -y as shown below example.
yum install firefoxyum -y install firefox
Removing a Package with YUM
yum remove firefoxIn the same way, the above command will ask for confirmation before removing a package. To disable the confirmation prompt just add option -y as shown below.yum -y remove firefox
Updating a Package using YUM
yum update mysql
List a Package using YUM
yum list openssh
连接远程 linux
用 .pem file 连接先 chmod 600 [fileName]ssh -i KEYFILE bitnami@SERVER-IP
vscode 连接远程服务器时,Permission denied publickey,gssapi-keyex,gssapi-with-mic
使用vscode 连接远程服务器时,要求.pem 文件的权限为属主只读chmod 400 [fileName]
curl
curl -v -x socks5h://127.0.0.1:10809 https://www.google.comcurl http://www.google.com --proxy socks5h://127.0.0.1:10809
常用命令
//复制指定目录下的全部文件到另一个目录中//假设复制源目录 为 dir1 ,目标目录为dir2//如果dir2目录不存在,则可以直接使用cp -r dir1 dir2//如果dir2目录已存在,则需要使用cp -r dir1/. dir2//如果dir2目录已存在,这时使用cp -r dir1 dir2,则也会将dir1目录复制到dir2中,明显不符合要求
linux 移动文件夹
//移动文件mv file destination//移动所有文件(包括隐藏文件)mv .[^.]* destinationeg:mv express_test/.[^.]* crawl.90m.top///将 express_test 里面的所有文件放到crawl.90m.top里面
linux 创建 文件 夹
mkdir [-mp] 目录名
-m 选项用于手动配置所创建目录的权限,而不再使用默认权限。-p 选项递归创建所有目录,以创建 /home/test/demo 为例,在默认情况下,你需要一层一层的创建各个目录,而使用 -p 选项,则系统会自动帮你创建 /home、/home/test 以及 /home/test/demo。mkdir cangls
系统时间
// 查看系统时间date -R//将系统日期设定成2009年11月3日的命令(sudo) date -s 11/03/2009//将系统时间设定成下午5点55分55秒的命令(sudo) date -s 17:55:55当前时间和日期写入BIOS,避免重启后失效(sudo) hwclock -w//设置Linux服务器时区tzselect
解压和压缩
//把根目录下的bbs.tar.zip解压到/zzz/bbs下,前提要保证存在/zzz/bbs这个目录//这个和cp命令有点不同,cp命令如果这个目录不存在,就会自动创建这个目录!tar zxvf /bbs.tar.zip -C /zzz/bbs
tar 打包
用tar命令打包
将 当前目录下的zzz文件 打包到当前目录下并命名为zzz.tar.gz
tar -zcvf zzz.tar.gz ./zzz//将/home/leon/Staging 目录打包,命名为august_project.tar.gztar -zcvf august_project.tar.gz /home/leon/Staging
linux 解压zip
zip 和 unzip
以下命令均在/home目录下操作cd /home #进入/home目录1、把/home目录下面的mydata目录压缩为mydata.zipzip -r mydata.zip mydata #压缩mydata目录2、把/home目录下面的mydata.zip解压到mydatabak目录里面unzip mydata.zip -d mydatabak3、把/home目录下面的abc文件夹和123.txt压缩成为abc123.zipzip -r abc123.zip abc 123.txt4、把/home目录下面的wwwroot.zip直接解压到/home目录里面unzip wwwroot.zip5、把/home目录下面的abc12.zip、abc23.zip、abc34.zip同时解压到/home目录里面unzip abc\*.zip6、查看把/home目录下面的wwwroot.zip里面的内容unzip -v wwwroot.zip7、验证/home目录下面的wwwroot.zip是否完整unzip -t wwwroot.zip8、把/home目录下面wwwroot.zip里面的所有文件解压到第一级目录unzip -j wwwroot.zip
测试能否访问网络或者某个网页
curl http://www.baidu.com/index.html
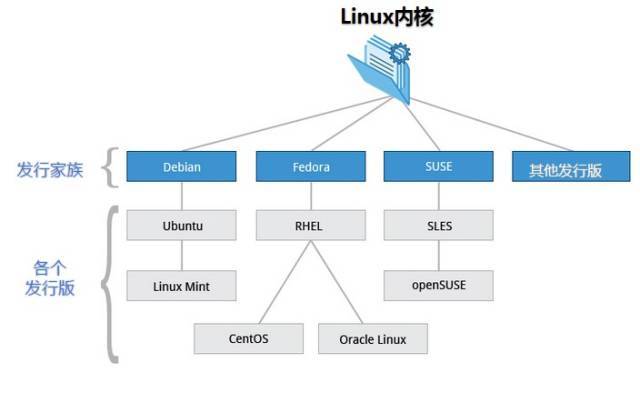
linux 各个发行版的关系

服务管理
服务与端口
/etc/services//这个文件记录了端口与服务的映射关系
netstat -tlunp
查看所有的服务
- -t 列出tcp 数据
- -u 列出udp 数据
- -l 列出正在监听的网络服务(不包含已经连接的网络服务)
- -n 用端口号来显示服务,而不是用服务名
- -p 列出该服务的进程ID(PID)
ubuntu 查看端口占用
linux 查看端口占用,查看指定端口的使用的情况
lsof -i tcp:80查看 10020 端口状态lsof -i:10020COMMAND PID USER FD TYPE DEVICE SIZE/OFF NODE NAMEnode 58954 leon 22u IPv6 9275377 0t0 TCP *:10020 (LISTEN)杀掉10020对应的进程 PID(58954),因此10020端口就free了kill -9 58954对于windows查看指定端口的占用情况,并找到其pidnetstat -aon|findstr "8080"直接强制杀死指定端口taskkill /pid 4136 -t -f
ss command
ss is the socket statistics command that replaces netstat
ss的优势在于它能够显示更多更详细的有关TCP和连接状态的信息,而且比netstat更快速更高效
ss [ OPTIONS ] [ FILTER ]ss -t -a 【显示TCP连接】-t: tcp-a: all-l: listening 【ss -l列出所有打开的网络连接端口】-s: summary 【显示 Sockets 摘要】-p: progress-n: numeric 【不解析服务名称】-r: resolve 【解析服务名称】-m: memory 【显示内存情况】
linux 查看端口占用,查看所有端口情况
lsof -i -P | grep -i 'listen'
查看某服务器的某个端口是否开启
nc -zv ip porteg:nc -zv 3.xx.121.xx 22
pkill命令
根据进程名kill进程
pkill nginx
netstat -an
查看已经连接的服务
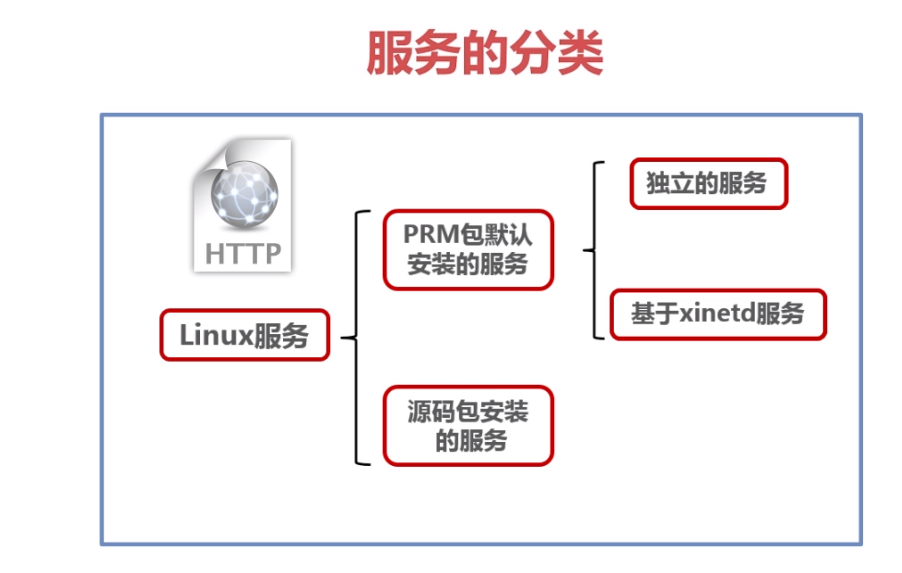
Linux 服务

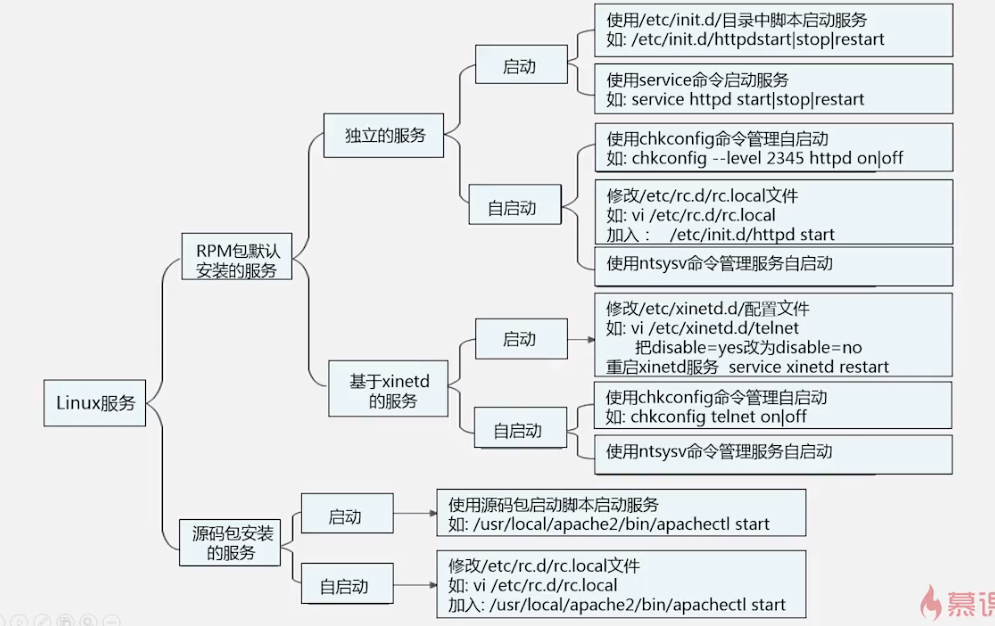
独立服务的启动 (RPM包)
/etc/init.d/独立服务名start| stop|status|restartservice 独立服务名start| stop|status|restart独立服务的自启动 设置chkconfig --level 2345 httpd on将 httpd(apache)服务 在2345运行级别时,设为自启动或者修改文件 /etc/rc.local 文件,加上想启动的服务,如/etc/init.d/httpd start这样httpd 服务开机时就会自启动
基于xinetd服务 (RPM包)
yum -y install xinetd//先安装xinetd 服务修改某个服务如rsync的启动vi /etc/xinetd.d/rsync把里面设置为 disable = no 就启动设置为 disable = yes 就不启动然后重启 xinted 服务service xinted restartxinetd 服务启动和自启动是一体的,也就是说你把它启动了,他同时也会变成自启动你把他设为自启动,他同时也启动了xinetd 服务已越来越少了
源码包安装服务的启动
使用绝对路径,调用启动脚本来启动,如:
/usr/local/apache2/bin/apachectl start|stop
源码包安装服务的自启动
一般装在 /usr/local/下
修改 /etc/rc.d/rc.local (软连接同/etc/rc.local)如 vi /etc/rc.d/rc.local然后加入某个服务的启动脚本如:/usr/local/apache2/bin/apachectl start
让源码包服务被服务管理命令识别
方法建立软连接,如让源码包的apache服务能被service命令管理启动
ln -s /usr/local/apache2/bin/apachectl /etc/init.d/apache
chkconfig --list//查看所有服务在不同运行级别下的自启动状态chkconfig --list | grep httpd只查看httpd 的自启动状态chkconfig --level 2345 httpd off将httpd的2345 级别的自启动关闭grep rsync /etc/services在services 里查看rsync
| 缩写 | 含义 |
|---|---|
| usr | Unix System Resource(Unix 系统资源) |
| Content column 1 | Content column 2 |
| Content column 1 | Content column 2 |
| Content column 1 | Content column 2 |
查看磁盘还剩多少空间
df -h
常用查看系统、资源、服务、用户等命令
进程
ps -ef # 查看所有进程top # 实时显示进程状态
1.CPU占用最多的前10个进程ps auxw|head -1;ps auxw|sort -rn -k3|head -102.内存消耗最多的前10个进程ps auxw|head -1;ps auxw|sort -rn -k4|head -103.虚拟内存使用最多的前10个进程ps auxw|head -1;ps auxw|sort -rn -k5|head -10
查看 nginx 的位置
// 查看 nginx 的位置// 如果程序在运行中ps -ef | grep nginx//如果程序并没有运行whereis nginx
free命令是一个快速查看内存使用情况的方法
free -h
rpm(Redhat Linux Packet Manager)
rpm包的安装: 1.安装一个包
rpm -ivh rpm包名如:rpm -ivh apache-1.3.6.i386.rpm
2.升级一个包,没安装过的不能使用升级命令
rpm -Uvh
3.移走一个包
rpm -e
运行级别
| 运行级别 | 含义 |
|---|---|
| 0 | 关机 |
| 1 | 单用户模式,可以想象为windows的安全模式,主要用于系统修复 |
| 2 | 不完全的命令行模式,不含NFS服务 |
| 3 | 完全的命令行模式,就是标准的字符界面 |
| 4 | 系统保留 |
| 5 | 图形模式 |
| 6 | 重启动 |
查看运行级别 runlevel
runlevelN 5//表示现在级别是5,也就是图形模式,N表示进入5级别之前的级别,N表示没有,也就是开机后就到了5级别,图形模式
Linux 文件基本属性
Linux系统是一种典型的多用户系统,不同的用户处于不同的地位,拥有不同的权限。为了保护系统的安全性,Linux系统对不同的用户访问同一文件(包括目录文件)的权限做了不同的规定。
ls –l
命令来显示一个文件的属性以及文件所属的用户和组
[root@www /]# ls -ltotal 64dr-xr-xr-x 2 root root 4096 Dec 14 2012 bindr-xr-xr-x 4 root root 4096 Apr 19 2012 boot
linux 查看文件大小
ls -lh//可以友好地显示文件大小, gives human readable file sizes, long format.
Linux中第一个字符代表这个文件是目录、文件或链接文件等等。
当为[ d ]则是目录; 当为[ - ]则是文件
接下来的字符中,以三个为一组,且均为『rwx』 的三个参数的组合。其中,[ r ]代表可读(read)、[ w ]代表可写(write)、[ x ]代表可执行(execute)。 要注意的是,这三个权限的位置不会改变,如果没有权限,就会出现减号[ - ]而已。

可读,可写,可执行分别的权限数值为
- r = 4
- w = 2
- x = 1
linux 删除文件夹/文件
rm -rf 目录名字-r 向下递归,不管有多少级目录,一并删除。-f 直接强行删除,没有任何提示。rm -rf /var/log/httpd
删除隐藏文件
rm -fr .*(删除当前目录下的所有隐藏文件)
Linux查看文件和文件夹大小
//查看目前所有文件系统的可用空间及使用情形df -h//查看文件或文件夹的磁盘使用空间du -h --max-depth=1 your_dest_dir//调节--max-depth参数,用来控制你想要查看的目录的深度,//--max-depth=1 your_dest_dir 只会返回目标文件夹和目标文件夹下首层文件夹的大小,不会返回更深层的文件夹的大小,也不会返回文件的大小。//要还想返回目标文件夹下首层的文件大小,可以使用下述命令:du -h --max-depth=0 your_dest_dir/*//它不仅返回了首层的文件夹大小,也返回了首层的文件大小
更改文件属性
chgrp:更改文件属组
chgrp [-R] 属组名 文件名-R:递归更改文件属组,就是在更改某个目录文件的属组时,如果加上-R的参数,那么该目录下的所有文件的属组都会更改。
chown:更改文件属主,也可以同时更改文件属组
chown [–R] 属主名 文件名chown [-R] 属主名:属组名 文件名
chmod:更改文件9个属性
每种身份(owner/group/others)各自的三个权限(r/w/x)分数是需要累加的,例如当权限为: [-rwxrwx---] 分数则是:owner = rwx = 4+2+1 = 7group = rwx = 4+2+1 = 7others= --- = 0+0+0 = 0所以等一下我们设定权限的变更时,该文件的权限数字就是770啦!变更权限的指令chmod的语法是这样的chmod [-R] xyz 文件或目录xyz : 就是刚刚提到的数字类型的权限属性,为 rwx 属性数值的相加。eg:要将.bashrc这个文件所有的权限都设定启用chmod 777 .bashrc// 将cc.av 的用户(u)加上(+)可执行(x)权限chmod u+x cc.av//将bb.av 的组(g)和 其他用户(o)都加上写(w)的权限chmod g+w,o+w bb.av//所有用户(a),都将赋予对dd.av 的读写执行权限chmod a=rwx dd.av//将改变应用到其子目录和文件上 加上 -Rchmod g+w someFolder -R
符号类型改变文件权限
还有一个改变权限的方法呦!从之前的介绍中我们可以发现,基本上就九个权限分别是(1)user (2)group (3)others三种身份啦! 那么我们就可以藉由u, g, o来代表三种身份的权限!此外, a 则代表 all 亦即全部的身份!那么读写的权限就可以写成r, w, x!也就是可以使用底下的方式来看:
如果我们需要将文件权限设置为 -rwxr-xr-- ,可以使用 chmod u=rwx,g=rx,o=r 文件名 来设定:
# touch test1 // 创建 test1 文件# ls -al test1 // 查看 test1 默认权限-rw-r--r-- 1 root root 0 Nov 15 10:32 test1# chmod u=rwx,g=rx,o=r test1 // 修改 test1 权限# ls -al test1-rwxr-xr-- 1 root root 0 Nov 15 10:32 test1
而如果是要将权限去掉而不改变其他已存在的权限呢?例如要拿掉全部人的可执行权限,则:
# chmod a-x test1# ls -al test1-rw-r--r-- 1 root root 0 Nov 15 10:32 test1a 表示所有用户,-表示减去什么权限,x表示执行权限
查看文件内容
cat 文件名//加上文件行数查看cat -n 文件名
Linux 用户和用户组管理
cat /etc/passwd//可以查看所有用户的列表w//可以查看当前活跃的用户列表cat /etc/group//查看用户组返回格式如下root:x:0:daemon:x:1:bin:x:2:adm:x:4:syslog,usernameEach line in this file represents a single group and contains the following fields, separated by colons (:):Group name: The name of the group.Password: Group password, if any. Usually, this field contains an x indicating that the password is stored in a shadow file.GID: The group ID number.Group List: A comma-separated list of usernames that are members of the group.创建系统用户的组sudo groupadd ftpgroupgroups//查看当前登录用户的组内成员groups gliethttp//查看gliethttp用户所在的组,以及组内成员whoami//查看当前登录用户名cat /etc/passwd|grep -v nologin|grep -v halt|grep -v shutdown|awk -F":" '{ print $1"|"$3"|"$4 }'|more//一个简明的layout命令sudo usermod -aG ftpgroup ubuntu// 给一个用户添加到某个组里,不移除其已所属的组// 为用户 ubuntu 加到一个 ftpgroup 组里groups usernameeg:groups ubuntu//查看一个用户所在的组useradd//添加用户eg:useradd name1//会自动创建用户家目录/home/name1//此时此用户的用户名和所属组分别为name1 : name1//修改 name1 用户的passwordpasswd name1//将name1的所属组设置为root//修改完毕,现在可以用name1帐号登录,然后用命令 su - ,即可获得root权限进行操作。//此时此用户的用户名和所属组分别为name1 : rootusermod -g root name1//另外要使 name1 有 root 权限还需要切换到root用户,运行visudo命令在打开的配置文件中,找到root ALL=(ALL) ALL,在下面添加一行xxx ALL=(ALL) ALL其中xxx是你要加入的用户名称,这里是name1输入:wq保存并退出配置文件,改动立即生效删除用户userdeleg:sudo userdel ftpuser
切换用户
su为switch user,即切换用户的简写su [user_name] || su - [user_name]eg:su centos// su - 与su 区别su - USERNAME切换用户后,同时切换到新用户的工作环境中su USERNAME切换用户后,不改变原用户的工作目录,及其他环境变量目录su 如果不指定USERNAME(用户名),默认即为root所以切换到root的身份的命令即为:su -root或是直接 su -通过命令exit或logout,或者是快捷键Ctrl+D即可返回原用户身份sudo使用su切换用户时需知晓对应用户的登陆密码,即若切换成root用户身份,需知道root用户的登陆密码。作为root用户管理员,如何授权其他普通用户,在不需要知晓root密码的情况下,执行root权限的命令操作?此时即可使用sudo。sudo是一种权限管理机制,依赖于/etc/sudoers,其定义了授权给哪个用户可以以管理员的身份能够执行什么样的管理命令;格式:sudo -u USERNAME COMMAND默认情况下,系统只有root用户可以执行sudo命令。需要root用户通过使用visudo命令编辑sudo的配置文件/etc/sudoers,才可以授权其他普通用户执行sudo命令。
lets encript
nginx
location ~ /.well-known {allow all;}# Pass requests for / to localhost:5000:location / {proxy_set_header X-Real-IP $remote_addr;proxy_set_header X-Forwarded-For $proxy_add_x_forwarded_for;proxy_set_header X-NginX-Proxy true;proxy_pass http://localhost:5000/;proxy_ssl_session_reuse off;proxy_set_header Host $http_host;proxy_cache_bypass $http_upgrade;proxy_redirect off;}
apache
//在相应站点的配置文件里,如 autopostapi.ahotech.xyz.conf的80 和 443 配置里面都加上<Directory /.well-known/acme-challenge/ >Order Deny,AllowAllow from All</Directory>//配置(node.js)代理<Location />ProxyPass http://127.0.0.1:1340/ProxyPassReverse http://127.0.0.1:1340/</Location>
ubuntu add samba
1.Start by updating the apt packages index:sudo apt update2.Install the Samba package with the following command:sudo apt install samba3.Once the installation is completed, the Samba service will start automatically. To check whether the Samba server is running, type:sudo systemctl status nmbd4.创建一个用于分享的samba目录。sudo mkdir /home/linuxidc/linuxidc.com/share5.给创建的这个目录设置权限sudo chmod 777 /home/linuxidc/linuxidc.com/share添加用户(下面的anthony是我的用户名,之后会需要设置samba的密码)。sudo smbpasswd -a anthonysudo cat /etc/samba/smb.confsudo vim /etc/samba/smb.conf在配置文件smb.conf的最后添加下面的内容:[august_project]path=/home/anthony/august_projectpublic = yescreate mask = 0777directory mask = 0777available = yesbrowseable = yescomment = Shared Folder require passwordvalid users = anthonyforce user = anthonywritable = yes重启sudo service smbd restartor/etc/init.d/smbd restart
find
find [目录] 条件(目录不指定默认是当前目录)选项:-name:通过名称搜索,不仅仅只是文件名-size:通过大小搜索:不仅仅只是文件大小-type:通过文件类型搜索-maxdepth:指定搜索层级,可配合其他一起使用eg:找的所在目录下所有 文件 类型的,大小为 2809856 bytes 的文件并删除find . -type 'f' -size 2809856c -delete-size -160k表示小于 160 kilobytes-size +160k表示 大于 160 kilobytes-size 160k表示 等于 160 kilobytes如果文件单位是 bytes,则在数字后面加上c, 如文件大小 160 bytes-size 160cuse case://Find Files Using Name in Current Directory//Find all the files whose name is tecmint.txt in a current working directory.find . -name tecmint.txt//Find all the files under /home directory with name tecmint.txt.find /home -name tecmint.txt//Find Files Using Name and Ignoring Case//Find all the files whose name is tecmint.txt and contains both capital and small letters in /home directory.find /home -iname tecmint.txt//Find Directories Using Name//Find all directories whose name is Tecmint in / directory.find / -type d -name Tecmint//Find all PHP Files in Directoryfind . -type f -name "*.php"
什么是serverless
Serverless computing is a cloud computing execution model in which the cloud provider runs the server, and dynamically manages the allocation of machine resources. Pricing is based on the actual amount of resources consumed by an application, rather than on pre-purchased units of capacity
wget
By default, wget downloads files in the current working directory where it is run.wget https://wordpress.org/latest.zip指的下载位置-P or --directory-prefixwget https://wordpress.org/latest.zip -P cable.90m.top
如何开放 Linux 端口,以便公网访问
云平台服务器要参考云平台的端口开放流程
iptable 的配置
//查看 iptables 运行状态service iptables status// 查看具体端口配置iptables -nL --line-number//将端口 8001添加到安全组iptables -A INPUT -ptcp --dport 8001 -j ACCEPT//保存 iptables 配置service iptables save删除某一个端口规则,比如8080端口// 先使用命令查看具体端口(8080)配置的位置iptables -nL --line-number比如在第4行,下面命令就删除了8080端口的开发iptables -D INPUT 4//卸载 (oneinstack自带的和新安装的iptables-services )yum remove iptablesyum remove iptables-services
localhost,127.0.0.1, 0.0.0.0,本机IP 的区别
localhost 是一个域名,在过去它指向 127.0.0.1 这个IP地址。在操作系统支持 ipv6 后,它同时还指向ipv6 的地址 [::1]127.0.0.1 这个地址通常分配给 loopback 接口。loopback 是一个特殊的网络接口(可理解成虚拟网卡),用于本机中各个应用之间的网络交互。只要操作系统的网络组件是正常的,loopback 就能工作。本机IP,确切地说,“本机地址”并不是一个规范的名词。通常情况下,指的是“本机物理网卡所绑定的网络协议地址”。比如IPv4 或者IPv6地址在服务器中,0.0.0.0指的是本机上的所有IPV4地址,,如果我绑定的端口指定了0.0.0.0,那么通过内网地址或外网地址都可以访问我的应用。但是如果我只绑定了内网地址,那么通过外网地址就不能访问
Private IP address 私有IP地址
10.0.0.0 to 10.255.255.255 (10.0.0.0/8):大型企业或组织适用比如一些云平台某服务器的私有IP地址如:10.0.0.4This range provides a large pool of addresses for use in private networks. It is commonly used by large organizations and enterprises.172.16.0.0 to 172.31.255.255 (172.16.0.0/12):中型-大型网络适用This range consists of multiple Class B networks within the 172.16.0.0/12 network space. It is often used for medium to large-sized networks.192.168.0.0 to 192.168.255.255 (192.168.0.0/16):中小企业适用比如我们开发者启动本地开发程序,可能会使用如 192.168.60.40 的地址This range is widely used for home networks and small to medium-sized businesses due to its ease of use and availability of addresses.
scp 本地与远程直接copy 文件
scp [-1246BCpqrv] [-c cipher] [-F ssh_config] [-i identity_file][-l limit] [-o ssh_option] [-P port] [-S program][[user@]host1:]file1 [...] [[user@]host2:]file2
Linux scp 命令用于 Linux 之间复制文件和目录。
scp 是 secure copy 的缩写, scp 是 linux 系统下基于 ssh 登陆进行安全的远程文件拷贝命令。
scp 是加密的,rcp 是不加密的,scp 是 rcp 的加强版。
将本地文件复制到远程服务器
scp local_file remote_username@remote_ip:remote_folderexample:将本地 /Users/luxingchao 下的 a.txt 复制到远程 47.240.**.15 服务器的 /root/dest_folder 目录下scp /Users/luxingchao/a.txt root@47.240.**.15:/root/dest_folder
复制本地目录到远程服务器
复制目录命令格式:
scp -r local_folder remote_username@remote_ip:remote_folderexample:将本地 test_folder 复制到远程 /root/dest_folder 目录下scp -r /Users/luxingchao/test_folder root@47.240.**.15:/root/dest_folder
将本地 test_folder文件夹下的所有文件 复制到远程 /root/dest_folder_b 目录下
scp -r /Users/luxingchao/test_folder/* root@47.240.**.15:/root/dest_folder_b
-i 从指定文件中读取传输时使用的密钥文件
scp -i /Users/luxingchao/aws/ls-su-us-west-2.pem /Users/luxingchao/a.txt centos@54.218.**.214:/tmp注意: 必须上传到服务器的 /tmp 这个路径下,因为只有这个路径有写入权限,可以上传之后移动你的文件到你需要的指定目录
从远程复制到本地
//复制文件//将远程的 /root/dest_folder/a.txt 移动到 本地/Users/luxingchao/test_folder 下scp root@47.240.**.15:/root/dest_folder/a.txt /Users/luxingchao/test_folder//复制目录//将远程的 /root/dest_folder (包含 dest_folder本身) 移动到 本地/Users/luxingchao/test_folder 下scp -r root@47.240.**.15:/root/dest_folder/ /Users/luxingchao/test_folder// -i 复制时从指定文件中读取传输时使用的密钥文件scp -i /Users/luxingchao/aws/ls-su-us-west-2.pem centos@54.218.*.214:/tmp/a.txt /Users/luxingchao/test_folderscp -i /Users/luxingchao/aws/ls-su-us-west-2.pem centos@54.218.*.214:/data/mongodata/ab.txt /Users/luxingchao/
scp 配置代理
scp 使用 Secure copy protocol
scp based on the Secure Shell protocol(SSH)
在家目录下的.ssh 目录下编辑 config 文件, 没有就新建
里面加上这个内容,表示代理 GitHub ssh 协议 的流量
Host github.comHostName github.comUser git# 走 HTTP 代理# ProxyCommand socat - PROXY:127.0.0.1:%h:%p,proxyport=7890# 走 socks5 代理(如 Shadowsocks)ProxyCommand nc -v -x 127.0.0.1:7890 %h %pHost 54.218.*.214HostName 54.218.*.214User git# 走 HTTP 代理# ProxyCommand socat - PROXY:127.0.0.1:%h:%p,proxyport=7890# 走 socks5 代理(如 Shadowsocks)ProxyCommand nc -v -x 127.0.0.1:7890 %h %p
rz 命令
//安装rz sz 命令yum install lrzszrz命令本地上传文件到服务器eg:rz//会打开选择文件对话框sz命令发送文件到本地eg:sz filename
日志 journalctl
journalctl 用来查询 systemd-journald 服务收集到的日志。
systemd-journald 服务是 systemd init 系统提供的收集系统日志的服务。
命令格式为:journalctl [OPTIONS…][MATCHES…]
journalctl 命令的路径为:/bin/journalctl
journalctl 常用的选项
-f : 实时显示最近的10条日志。-e : 跳转到日志末尾以显示最新事件。-r : 按时间倒序打印日志消息-k : 只显示内核日志。-u : 只显示指定systemd Unit的消息。-b : 显示来自特定引导的消息,如果不包括特定引导会话,则显示当前引导消息。–list-boots : 显示引导编号(相对于当前引导)、它的id以及与引导有关的第一个和最后一个消息的时间戳。–utc : 以UTC时间表示。-p, –priority= : 按消息优先级过滤输出。-S, –since= : 根据开始时间过滤日志-U, –until= : 根据结束时间过滤日志–disk-usage : 显示所有日志文件的当前磁盘使用情况。
journalctl 常用命令
// 按Unit过滤journalctl -u sshd.service//使用-f选项查看实时日志,如下所示。这在对某些问题进行故障排除时很有用。journalctl -f// 实时显示 trojan 的最新日志journalctl -uf trojan进入日志查看状态,如果日志很多可以使用空格键 往下翻页w 往上翻页回车键 往下翻一条下箭头 往下翻一条q 退出查看日志
tail
tail 命令可用于查看文件的内容,有一个常用的参数 -f 常用于查阅正在改变的日志文件。
tail -f filename 会把 filename 文件里的最尾部的内容显示在屏幕上,并且不断刷新,只要 filename 更新就可以看到最新的文件内容。
tail [参数] [文件]-f 循环读取-q 不显示处理信息-v 显示详细的处理信息-c<数目> 显示的字节数-n<行数> 显示文件的尾部 n 行内容--pid=PID 与-f合用,表示在进程ID,PID死掉之后结束-q, --quiet, --silent 从不输出给出文件名的首部-s, --sleep-interval=S 与-f合用,表示在每次反复的间隔休眠S秒eg:tail -f notes.log
sed
SED is a text stream editor used on Unix systems to edit files quickly and efficiently. The tool searches through, replaces, adds, and deletes lines in a text file without opening the file in a text editor.
Replace String Using the sed Command
sed 's/old_string/new_string/' filename.txteg: 将 test.txt 中的box 替换成bin(如果文本中某一行有多个box,只替换第一个)sed 's/box/bin/' test.txt如果全文替换需要加上gsed 's/old_string/new_string/g' filename.txt忽略大小写替换在命令后面加 iTo ignore case while substituting text, add the i subcommand at the end of the commandsed 's/old_string/new_string/i' filename.txtß实际案例sed -i 's/mirrorlist/#mirrorlist/g' /etc/yum.repos.d/CentOS-*
wc
calculates a file's word, line, character, or byte count
default output of wc is the file's number of lines, words, and characters,# wc kibana.log1899 8912 978114 kibana.log// -l 查看行数wc -l < kibana.log1899
split
split large files into smaller files. It splits the files into 1000 lines per file(by default)
split [options] name_of_file prefix_for_new_files// -l 是以多少行分割文件,如下面以4行分割文件index.txt,分割后的文件名以 split_file 开头split -l 4 index.txt split_file// -n 是平均分成多少份,如下面平均分成100份, 然后放到 tempfile文件夹下,分割后的文件以split-file开头split -n 100 wwwxxxuppliexom-out.log tempfile/split-file// Split file size using ‘-b’(bytes) option. 按大小分割split -b 16 index.txt index
在linux下执行php时无法执行,报错:php: command not found
查看php安装位置whereis php//返回安装目录/usr/local/phpexport PATH=$PATH:/usr/local/php/bin可以输入echo $PATH 查看下有没有添加成功如果还不行,则再输入以下命令:ln -s /usr/local/php/bin/php /usr/bin/php查看php 版本php -v
linux 清除当前命令行输入的内容 ctrl+u
// 比如下面你在命令行里输入了很长的内容,但是你不想执行了,想删除它,可以使用ctrl+u 命令删除,如果想恢复使用 ctrl+yroot@instance-v23:~# some very long content or some command
挂载新硬盘
查看硬盘列表,包括未挂载的磁盘lsblk// 可以查看硬盘列表,包含磁盘uuid信息lsblk -f//格式化磁盘Format the disk device using the mkfs tool// 注意 DEVICE_NAME 改成你的新的磁盘名sudo mkfs.ext4 -m 0 -E lazy_itable_init=0,lazy_journal_init=0,discard /dev/DEVICE_NAME挂载Mount the disk先创建要挂载到的目录,如 /datasudo mkdir -p /data//挂载sudo mount -o discard,defaults /dev/sba /dataConfigure read and write permissions on the disk. For this example, grant write access to the disk for all users.sudo chmod a+w /dataConfigure automatic mounting on VM restart配置重启服务器后自动挂载先备份一下fstab 文件sudo cp /etc/fstab /etc/fstab.backup//列出对应磁盘的uuidsudo blkid /dev/sba//编辑/etc/fstab, 加上一行UUID=UUID_VALUE /data ext4 discard,defaults,nofail 0 2sudo umount /dev/sdb如果umount 时无法umount,说 target is busy!use lsof +f -- /dev/sdb to list all processes with open files on the device containing the filesystem, and then kill themlsof +f -- /dev/sdbkill -9 pid
what is passwd file in linux
The passwd file is typically located in the /etc directory, The file has a simple text-based format, with each line representing a single user account and containing several fields separated by colons
example of a passwd file entry:
jdoe:x:1000:1000:John Doe:/home/jdoe:/bin/bashIn this example, the fields are:jdoe: the usernamex: the encrypted password (the actual password is stored in a separate file or database)1000: the user ID (UID)1000: the group ID (GID)John Doe: the user's full name or description/home/jdoe: the user's home directory/bin/bash: the user's default shell

